


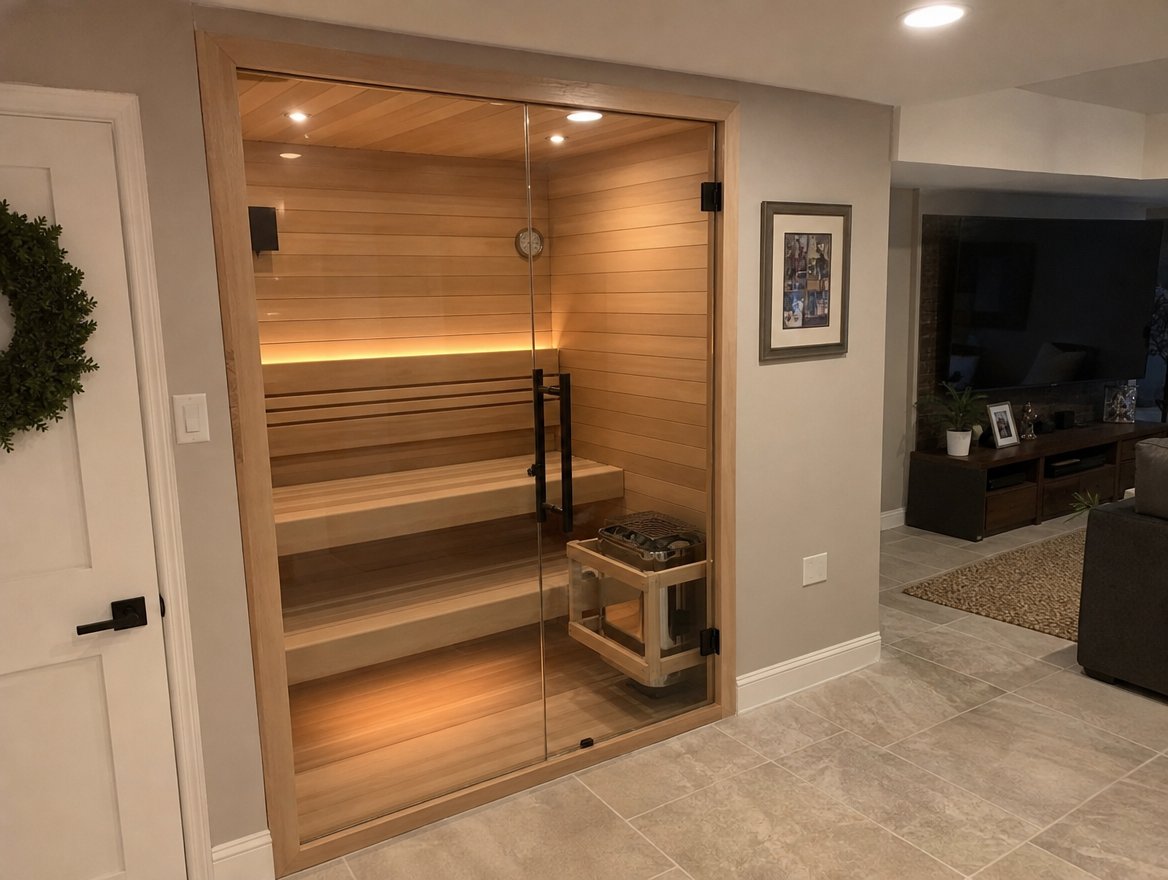
By Dan Woods, Saunass sauna specialist · Sources: Finnish sauna design guides, heater maker manuals, US code references, and builds that owners shared online
Published October 16, 2026 · Last updated October 16, 2026
Quick Answer: How Do You Build a Sauna?
You build a home sauna in a clear sequence. Pick DIY, a kit, or a prebuilt unit. Choose a location and size. Frame the shell. Insulate, add one foil vapor barrier, then panel the walls and ceiling. Build two-tier benches. Install a listed heater on a dedicated circuit. Add both vents. Run a first heat and finish the wood.
Most DIY indoor rooms take 40 to 60 hours over two or three weekends and about $5,000 to $10,000 in materials. A kit lands in a similar cost range and often goes up in about two weeks of spare time. A prebuilt unit skips the framing and paneling once the base and 240V circuit are ready.
This guide is the step-by-step build for indoor and general home saunas. For layouts and bench geometry, see our sauna building plans guide. Building in the yard? Use our outdoor sauna plans for foundations, roofs, and weatherproof shells, then come back here for the hot room sequence.
Choose Your Build Path
Three paths get you to a working hot room. Pick the one that matches your tools, timeline, and space.
| Path | Typical cost | Time | Best for |
|---|---|---|---|
| DIY from scratch | About $5,000 to $10,000 in materials | 40 to 60 hours over 2 to 3 weekends | Awkward spaces and full control of height and benches |
| Pre-cut kit | About $6,000 to $11,000 for the kit, plus framing and wiring | About 2 weeks of spare time | Spare rooms with a known design |
| Prebuilt sauna | About $5,000 to $9,000 and up | Days once the base and circuit are ready | Buyers who want heat this season |
| Full custom build | Often $15,000 to $25,000 or more outdoors | Months | Unusual sites or high end finishes |
DIY wins when the space is odd: a short basement, a garage corner, or a ceiling that needs a stepped floor under the benches. Kits win when you want a known design and a cut list. Prebuilt wins when you want heat this month.
For a one person indoor corner, the Sweat Box is ready once you have floor space and power. For a framed spare room, a pre-cut indoor kit like the Carbon Smart 6x8 or a custom indoor sauna room ships the interior parts. Outside, the Sweat Barrel, the Sweat Cabin, and the Golden Designs Arlberg need a level pad and a circuit. Browse indoor saunas, outdoor saunas, and all sauna kits before you buy lumber.

Pick Location and Size
Indoors, basements and garages are the usual spots. You need a dry floor, a path for a glass door that swings out, and space for a dedicated 240V circuit. Outdoors, you need a drained base, setbacks your town allows, and a power or chimney plan. Outdoor bases and roofs are covered in outdoor sauna plans.
Size the hot room for a normal day, not a party night. Bigger rooms heat slower and need a larger heater.
| Hot room (inside) | Good for | Notes |
|---|---|---|
| 3x4 to 4x4 | 1 person | Sit only. Fast heat. Fits a closet or bathroom corner. |
| 4x6 to 5x7 | 2 people | One person can lie down on a 6 or 7 ft bench. |
| 6x6 to 6x8 | 2 to 4 people | Sweet spot for most homes. An 8 ft wall gives a full lie-down bench. |
| 7x7 to 8x8 | 4 to 6 people | Room for an L bench. Needs a larger heater. |
A popular indoor target is 6x6 to 6x8 with about an 8 foot ceiling. That seats two to four and leaves room for one long bench. Two person rooms often land at 4x6 to 5x7. Keep the door and heater on the same short wall so the long wall stays free for benches.
Full plan drawings, bench heights, and cut lists live in our sauna building plans article. Draw those before you cut the first stud.
Frame the Shell and Floor

Frame a freestanding box or use existing walls where code allows. Typical indoor walls use 2x4 studs at 16 inches on center. Leave rough openings for the door, the heater clearances, and both vents. Protect any house vapor barrier you cut into, then plan the sauna foil on the hot side later.
For the floor, tile or sealed concrete works indoors. Slope toward a drain if you want to rinse. Removable duckboards keep feet warm. Outdoors, use a gravel pad, pavers, or a slab that drains, then follow the outdoor base details in the outdoor plans guide.
Check heater clearances now. Mark the stone height on the wall. The foot bench must sit above that line.
Build the Wall Layers
Heat and steam leave the room only if the wall stack is right. From the house side inward:
- Finish on the room side you see from the house, such as drywall.
- 2x4 studs filled with mineral wool or other high-temp insulation.
- One foil vapor barrier on the hot side, seams taped with foil tape as one continuous layer across walls and ceiling.
- Furring strips that leave a small air gap behind the boards.
- Tongue and groove paneling in cedar, aspen, hemlock, or thermally modified wood.

Insulate the ceiling the most. Heat collects there. Use one vapor barrier only. Do not add plastic on the cold side. Owners who shared their builds online keep stressing continuous foil and extra ceiling insulation. Those two details stop soft walls and damp framing.

Panel the ceiling first, then the walls. Nail through the tongue so faces stay clean. Leave the small air gap behind the boards so the foil can breathe and dry.
Build Benches and Hang the Door

Build two tiers. Put the foot bench above the heater stones, often 34 inches or higher. Set the upper bench 16 to 18 inches above the foot bench. Leave 44 to 48 inches of head room above the upper bench. Make the upper bench 24 to 28 inches deep, and aim for one bench about 76 to 80 inches long if someone wants to lie down.
Use smooth, knot-light wood that stays cool to the touch. Aspen and clear cedar are common. Soft edges matter. Skip softwoods full of pitch near the heater.
Hang an outward swinging door with no lock. A tempered glass door is popular and needs a larger heater. Keep hardware cool to the touch. For lighting, use low, shielded fixtures and read our sauna lighting guide before you wire them.
Install the Heater and Electrical

Size the heater to the room. A common starting point is about 1 kW for every 45 to 50 cubic feet. Add capacity for glass walls, a glass door, or uninsulated concrete. The heater maker's room table has the final say. Place the heater near the door on a wall the benches face.
Most electric heaters need a dedicated 240V circuit. Hire a licensed electrician. Choose a heater listed to UL 875. Install the wooden guard rail and fill the stones as the manual shows. The Harvia KIP60B 6 kW is a common size for mid-size rooms. Compare options in electric sauna heaters.
Prefer fire for a cabin or cold climate? A wood stove needs a listed chimney, more clearance, and a non-combustible base. See wood-burning sauna stoves.
Add Ventilation
A sealed box feels stuffy fast. Mark both vents on the wall before you panel.
- Fresh air in near the heater, above it or as the manual shows.
- Exhaust out on the far side, often low under the foot bench with a quiet fan.
- Size about 20 to 25 CFM per person, or roughly 12 to 13 square inches of free area for a small 4x6 room.
- Duct exhaust outside, never into the basement or attic.
Some manuals put the intake low behind or under the heater. Follow the manual when it disagrees with a general guide.
First Heat and Finish
Before the first real session, clean dust, vacuum stones, and wipe the wood. Run a first heat with the door cracked so binders and shop smells leave the room. Stay nearby. Check clearances, thermostat, and vents.
Treat benches and walls with a sauna-safe wax or oil made for hot rooms. Owners who shared their builds often say to spend money here, not on fancy buckets. Soften sharp edges. Add a thermometer and a hygrometer at upper-bench height. Confirm the room reaches your target band. For target temps, see how hot a sauna should be.
Cost and Time
| Item | Typical DIY indoor range | Notes |
|---|---|---|
| Lumber, insulation, foil, paneling | $2,000 to $4,500 | Cedar and aspen cost more than basic softwood |
| Door, benches, hardware, lights | $800 to $2,000 | Glass doors raise heater size |
| Electric heater and stones | $1,000 to $2,500 | Plus electrician and circuit |
| Permits and extras | $200 to $1,500+ | Outdoor site work is separate and can be large |
Plan the full budget, not just the hot room. Foundation, a 240V run, permits, and site prep can double an outdoor total. Custom outdoor quotes owners shared online often passed $50,000 once site work was included. Indoor DIY rooms usually stay in the few-thousand to low-ten-thousand range. For a wider price picture, read how much a sauna costs and our home sauna buying guide.


Want heat without framing? Compare outdoor picks in our best outdoor saunas guide, or browse outdoor saunas and indoor saunas.
Build Checklist
- Path chosen: DIY, kit, or prebuilt
- Location dry, with door swing and circuit path planned
- Room size matches your normal group
- Ceiling height supports high benches, or a raised bench floor is planned
- Studs framed, floor finished or duckboards ready
- Insulation in, one continuous foil barrier taped, air gap and paneling on
- Two-tier benches with feet above the stones
- Outward swinging door, no lock, shielded lights
- Listed heater, guard rail, stones, licensed 240V circuit
- Supply and exhaust vents ducted correctly
- First heat done, wood treated, thermometer at bench height
How to Build a Sauna: FAQ
Quick answers to the questions home builders ask most. Tap a question to open it.
How hard is it to build a sauna?
A framed indoor hot room is a weekend project for the shell, then paneling and benches. The heater circuit is the hard part. Most owners who shared their builds spent 40 to 60 hours over two or three weekends.
How long does a DIY sauna build take?
Kits often go up in about two weeks of spare time. A full outdoor framed build with a foundation and power run can take a month or more.
How much does it cost to build a sauna?
A pre-cut kit lands in a similar range once framing and wiring are in. Prebuilt units start lower and skip most labor. Outdoor site prep, a 240V run, and permits can double the outdoor total.
Should I DIY, buy a kit, or go prebuilt?
DIY wins in awkward basements. Kits trade design freedom for cut lists and instructions. Prebuilt barrel, cabin, and indoor units need a level base and a circuit.
What wall layers does a sauna need?
Tape every foil seam. Put the most insulation in the ceiling. Do not add a second vapor barrier on the cold side.
Where do the vents go?
Finnish guides often put supply near the heater and a quiet fan exhaust low under the foot bench. Match vent area to the room. Follow your heater manual when it disagrees.
Do I need a permit and a licensed electrician?
Electric heaters need a dedicated circuit and must list to UL 875. Check your town before you frame. Outdoor roofs, foundations, and setbacks are covered in our outdoor sauna plans guide.
Can I build outdoors instead of indoors?
Use this article for framing, walls, benches, heater, and first heat. For foundations, roofs, and backyard power, read outdoor sauna plans.
Building and electrical disclaimer: This article is general guidance, not engineering, code, or electrical advice. Rules vary by town. Follow your heater manual, your local building office, and a licensed electrician.
Next step: Not sure if you should build, buy a kit, or go prebuilt? Take the Sauna Finder Quiz, browse indoor saunas or outdoor saunas, or call us at (307) 222-0551. You can also email info@saunass.com.


